
Manual Table Install Issues
Table FAQs:
Table is REALLY dark
Day / Night | Emission Scale settings:
First thing to check is the Day/Night brightness, this can be changed via the .ini file:
[Player]
OverrideTableEmissionScale = 1
EmissionScale = 0.5
or via the table itself. Start the table, click return << button. Go down to Table Options > Day / Night and use the flippers to edit.
LUTs
LUTs are a feature on some tables that change the light profiles.
For the most part, if a table has LUTs options you can toggle them using the MagnaSave buttons.
First, check the VBS to see if they support LUTs. Search for the term LUT and see if there are any results.
While you are there, also check how the LUTs are changed. It's usually either left or right MagnaSave, or hold left MagnaSave and press right MagnaSave to toggle.
TIP
If you dont see a .vbs file, extract it in the TM. wiki guide here
TIP
To change the nudge buttons to MagnaSave, change them via the .ini file. wiki guide here
Once you find one you like, you want to save it.
Typically, it will either be saved in the .ini file, or in the .vbs file as a default value.
VBS example (Hook):
119 | Dim LUTset, DisableLUTSelector, LutToggleSound
120 | LUTset = 4
121 | DisableLUTSelector = 0  ' Disables the ability to change LUT option with magna saves in game when set to 1
122 | Table1.ColorGradeImage = "LUT" & LUTset & "_" & 8 - 1
LUTset = 4 to change the default.
INI example (GOT):
39 | [TableOption]
.. | ...
45 | LUT = 4.000000
LUT = 4.000000 to change the default.
Table is missing Music / Flex.DMD / Ultra.DMD / PUP - Where do I put it?
Anything that the table needs goes in its File Manager/external/vpx-{table}/ folder.
So if a table asks for a Music/{folder name}/ folder then you put it in the vpx-{table} folder like /external/vpx-{table}/Music/{folder name}/
Example in the Blood Machines description:
In order to fully enjoy the table and play it as it was designed to be played,
you will need to purchase the awesome soundtrack by Carpenter Brut (about £5/$5/5e)
and place the MP3s in your vpinball music directory:
C:\Visual Pinball\Music\BLOOD MACHINES OST
So for us, you'd put the MP3 files in: File Manager/external/vpx-bloodmachines/Music/BLOOD MACHINES OST
Table says to 'Update Script' - How do I do that?
Some tables require you to edit options / settings in the script. By 'script' they mean the .vbs script found inside every .vpx file.
If your table doesn't have one inside their File Manager/external/vpx-{table}/ folder, then you can extract it through the TM.
Click on the .vpx file, and at the top right hit VPX Tools > Extract VBS. This will extract the .vbs file and add it to the folder.
Once the file has been extracted, you can open it and search for the section you want.
Example request from Total Nuclear Annihilation:
Description ask you to:
... then you must find and set bMusicOn to true in the script like this:
        Const bMusicOn = True
So for this, you'd extract the .vbs file, open it, hit 'Control + F' to open the search bar (or if that doesn't work, you can find the option in top right ⋮ > find)
Then search for Const bMusicOn = and change the value from False to True
Table Won't Start - I Can Add Coins But No Lights
This is always a ROM issue.
Run through the below troubleshooting steps:
1) You are missing a ROM
Please re-install the table and make sure to include the ROM zip file
or add it manually into the /external/vpx-{table}/pinmame/roms folder
2) The ROM is incorrectly named
Sometimes we see ROM zip files called romname (1).zip etc.
It is very important that the rom name is correct.
You can manually update the ROM name in the /external/vpx-{table}/pinmame/roms folder
3) The ROM file has been unzipped
The ROM files must never be unzipped.
Please reinstall with the correctly zipped ROM file.
4) The cGameName variable in the .vbs is wrong
If you are adding a table yourself, you might use the correct ROM but the table .vbs is using a ROM alias.
That means that the cGameName variable in the .vbs is the wrong name.
Updating it in the .vbs will correct it.
5) You might need to start the table twice
Some tables NEED a .nvram file, and on first launch it creates one
Try booting the machine a second time now that the ROM has created the .nvram file.
Increase / Lower Volume
To update the volume, you'll need a USB keyboard.
If you need one, this one works great! Rii RK707 Keyboard/Game Controller Amazon US | Amazon UK | Amazon CA
As well as the below guides, there is also a list of guides on altering the volume on different tables here: vpforum tutorials
Bally / Midway / Williams:
1. Press END key to open coin door.
2. Using the 8 and 9 keys, adjust the volume. The 8 key will lower the volume, while the 9 key will raise the volume.
3. You may have to press END key to close the coin door.
Note: There may be tables where the coin door is already open when the table loads, so you may not have to perform step 1. However, you will not get notification that the door is open. To check to see if the door is open, press either the 7 or 0 key. If the message appears to open the coin door to use the buttons, then press the end key to open the door.
Capcom:
1. Press 7 to enter menu system.
2. Using the shift keys, cycle through the menus until you see Set Volume
3. Press 1 to select that menu
4. Using the shift keys, adjust the volume. Left Shift Key lowers the volume, Right Shift Key raises the volume
5. To exit the menu system, press the 7 key once.
Data East / Early Segas:
1. Press 7 to enter the audits and adjustments menu
2. Continue to press 7 until you see Expand Adjustments (or Expand Adjusts) in the DMD
3. Press 1 to change option to Yes
4. Continue to press 7 until you see Volume Adjustment or Background Music Volume in the DMD
5. Press 1 to adjust the volume percentage. You can either set it to OFF, or to 25%, 50%, 75%, 100%
6. Either continually press 7 to go through all the menu options to reset the table and save changes, or press F3.
Sega / Stern:
1. Using the 8 and 9 keys, adjust the volume.
2. The 9 key lowers the volume, the 8 key raises the volume (You may have to press the 9 key first to be able to adjust the volume)
Alvin G tables:
1. Using the 9 and 0 (zero) keys, adjust the volume. The 0 key lowers the volume, the 9 key raises the volume
2. Wait until you see GAME OVER in DMD to play with the new settings
Note: for these tables, this procedure will work if you use the ROM based sound. If you use the emulated sound that is included with these tables, you will NOT be able to adjust the volume
Configure nudge buttons as magnasave
Rebind the left and right nudge buttons using the following configuration in the ini:
[Player]
JoyLTiltKey                     = 0
JoyRTiltKey                     = 0
JoyLMagnaSave                   = 14
JoyRMagnaSave                   = 15
Plunger is weak
Adjust the strength of the plunger object in the script:
Plunger.MechStrength = 150
You may need a different name than Plunger depending on how the table is built. Look for the plunger object on the playfield.
If you need to increase the strength of an auto-plunger then you can do something similar in the vbs:
dim plungerIM
Set plungerIM = New cvpmImpulseP  ' <-- Just example to look out for

plungerIM.Strength = 75   ' <-- Change strength here!
How do I add altsound / altcolor?
Alts, sound and color, always go: vpx-tablename/pinmame/alt(color/sound)/romname
In order to use an AltSound it needs to be enabled in the tablename.ini under the Standalone header. If [Standalone] does not exist, please create it.
[Standalone]
AltSound = 1
Backglass FAQs:
I want to display the backglass at the appropriate aspect ratio
Add configuration to override the b2s size in the ini:
[Standalone]
B2SBackglassX = 5400
B2SBackglassWidth = 1201
Open the b2s in an editing tool (e.g. B2SBackglassDesigner) to determine the correct sizes. Center the image using a 1920 width.
Part of my backglass is missing
Try turning on the b2s grill by adding the following to the ini:
[Standalone]
B2SHideGrill = 0
FullDMD is not working
Try adding the following to the ini:
[Standalone]
B2SHideB2SDMD              = 0
B2SHideB2SBackglass        = 0
B2SHideDMD                 = 0
B2SDMDRotation             = 1
PinMAMEWindow              = 0
The key here is PinMAMEWindow = 0. That's what's been hiding the B2SDMD.
The last 2 lines are 100% required
DMD FAQs:
The DMD lags or doesn't update sometimes or if the table has a PuP-Pack
For the DMD try turning backglass threading off. It may impact performance, but can improve stability. If the table has a PuP-Pack, enabling this option is essential; otherwise, the table may begin to stutter and hang.
[Standalone]
WindowRenderMode = 0
I want to hide the DMD as it is duplicated on the backglass
Note: This will not work on every table. If it doesn't work then there's nothing you can do.
First, you will need to edit the VBS file. So if you haven't got one yet for this table - make sure to extract it via the Extract VBS file tool
Next, open the VBS file, search for Table1_Init (or similar)
And add the line .hidden = 1 to the list of settings for that tables initialization.
How to add a custom DMD image to an empty DMD
If your DMD is empty (i.e. the table uses backglass scoring) then you will see the default 'Legends Unchained' logo as the image.
If you would like to replace this with another image, just add a dmd.png file to your external/vpx-table folder!
The dmd.png image must:
- Be lowercase
- An Image size of 1920 x 1200
- Live right on the vpx-table folder root: external/vpx-table/dmd.png
Be sure to check the repo folders for a dmd.png file you can add to your table!
Examples:
My DMD is cut off on the left side
DMDLeftOffset and DMDRightOffset can be defined under [Standalone] with pixel values.
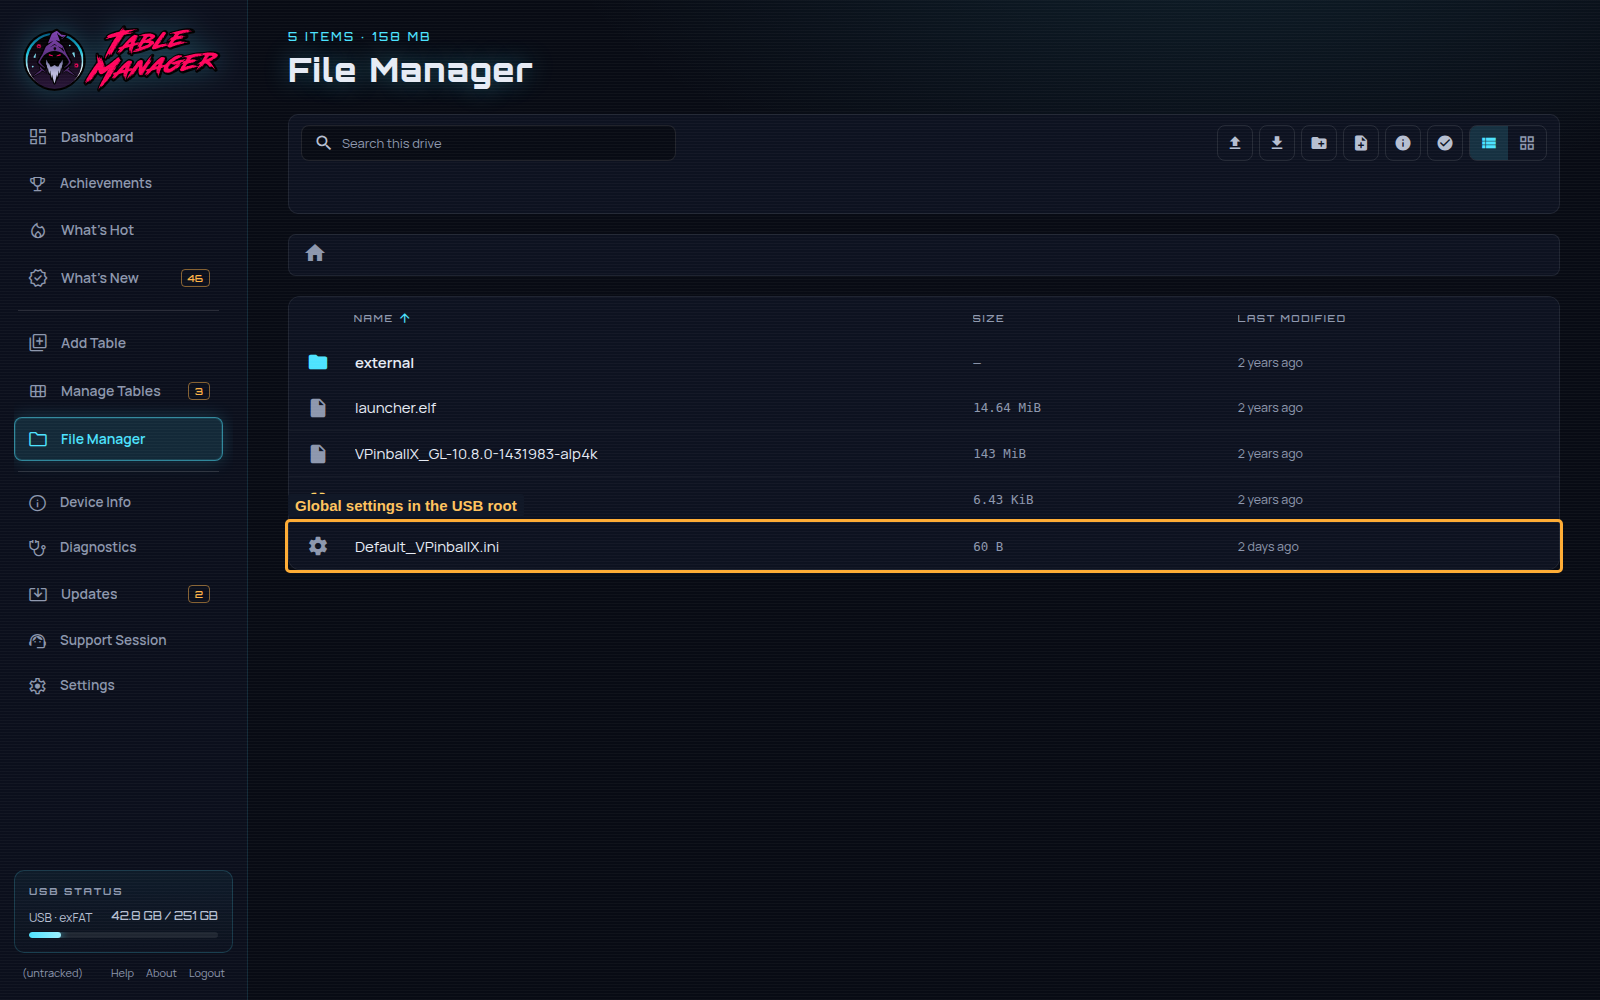
First of all, you need a Default_VPinballX.ini in the root of your USB drive.
Open File Manager in the sidebar. At the USB root, use New file to create Default_VPinballX.ini if it does not already exist. Double-click it to open the editor.
Once you have your default ini, add the below lines to the top of the file, directly under [Standalone]
[Standalone]
DMDLeftOffset = 15
DMDRightOffset = 0
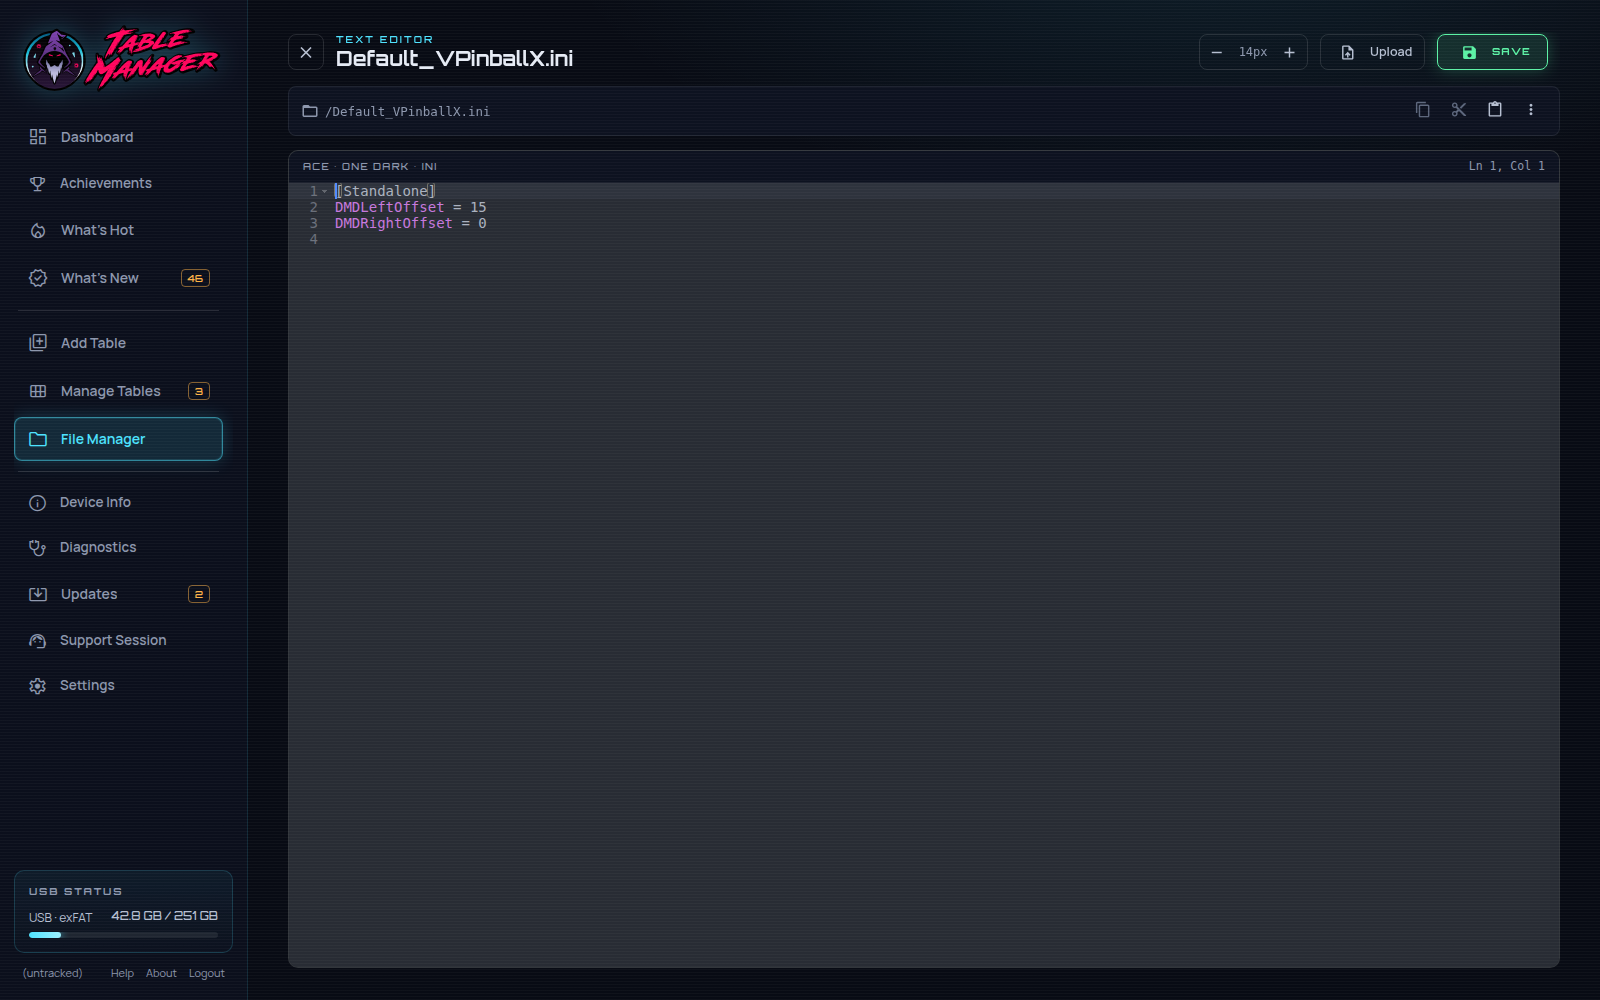
This will make your DMD image start 15 pixels further to the right.
Edit this value until you are happy on your machine!